Tuesday, December 19, 2017

LockerService


The LockerService architectural layer enhances security by isolating individual Lightning components in their own containers and enforcing coding best practices.
  • LockerService implicitly enables JavaScript ES5 strict mode.
  • A component can only traverse the DOM and access elements created by a component in the same namespace. You can’t use component.find("button1").getElement() to access the DOM element created by <lightning:button>.
  • LockerService applies restrictions to global references. LockerService provides secure versions of non-intrinsic objects, such as window. For example, the secure version of window is SecureWindow.
Salesforce have decoupled the Content Security Policy (CSP) from LockerService and have made it available as a critical security update.

References:
LockerService API Viewer app: http://documentation.auraframework.org/lockerApiTest/index.app?aura.mode=DEV
Share This:    Facebook Twitter

Sunday, December 3, 2017

Asynchronous Apex: Using future methods

You can call a future method
  • for executing long-running operations, such as callouts to external Web services or any operation you’d like to run in its own thread, on its own time.
  • to isolate DML operations on different sObject types to prevent the mixed DML error.
  • for taking advantage of higher governor limits

DML operations on certain sObjects, sometimes referred to as setup objects, can’t be mixed with DML on other sObjects in the same transaction. You must insert or update these types of sObjects in a different transaction to prevent operations from happening with incorrect access-level permissions. For example, you can’t update an account and a user role in a single transaction. However, deleting a DML operation has no restrictions.

Methods with the future annotation must be static methods, and can only return a void type. The specified parameters must be primitive data types, arrays of primitive data types, or collections of primitive data types.
global class FutureMethodRecordProcessing {
    @future
    public static void processRecords(List<ID> recordIds) {   
         List<Account> accts = [SELECT Name FROM Account WHERE Id IN :recordIds];
         // Process records
    }
}

Methods with the future annotation have the following limits:
  • No more than 50 method calls per Apex invocation
  • The maximum number of future method invocations per a 24-hour period is 250,000 or the number of user licenses in your organization multiplied by 200, whichever is greater.

How methods with future annotation can take sObjects or objects as arguments?
https://developer.salesforce.com/blogs/developer-relations/2013/06/passing-objects-to-future-annotated-methods.html

How to call a future method from a batch class?
https://salesforce.stackexchange.com/questions/24843/calling-future-method-from-batch

Share This:    Facebook Twitter

Apex: Get number of contacts for a list of accounts

Map<Id, Account> accountsById = new Map<Id, Account>([SELECT Id, Name FROM Account LIMIT 10]);
Set<Id> accountIds = accountsById.keySet();

Map<Id, Integer> numberOfContacts = new Map<Id, Integer>();
for (Account acc : [SELECT Id, Name, (SELECT Id FROM Contacts) FROM Account WHERE Id IN :accountIds]) {
    numberOfContacts.put(acc.Id, acc.Contacts.size());
}
System.debug(numberOfContacts);


Share This:    Facebook Twitter

Apex: Get all required fields of an sObject

Map<String, Schema.SObjectType> m  = Schema.getGlobalDescribe();
Schema.SObjectType s = m.get('Contact');
Schema.DescribeSObjectResult r = s.getDescribe();
Map<String,Schema.SObjectField> fields = r.fields.getMap();

for(String field : fields.keyset()) {
    Schema.DescribeFieldResult describeResult = fields.get(field).getDescribe();
    if (describeResult.isCreateable()  && !describeResult.isNillable() && !describeResult.isDefaultedOnCreate()) {
        System.debug(field);
    }
}


Share This:    Facebook Twitter

Saturday, December 2, 2017

Sunday, November 19, 2017

Saturday, November 18, 2017

Javascript: Pattern to create instance-specific private data


To make a property private, just make it local to the constructor. Any outside code trying to access age variable will result in an undefined. But the outside code can still call the property that accesses this private variable using the public function getAge.
function Person(name) {

   // Define a variable only accessible inside of the Person constructor
   var age = 25;

   this.name = name;

   this.getAge = function() {
      return age;
   };

   this.growOlder = function() {
      age++;
   };
}

var person = new Person("Nicholas");

console.log(person.name);     // "Nicholas"
console.log(person.getAge()); // 25

person.age = 100;
console.log(person.getAge()); // 25

person.growOlder();
console.log(person.getAge()); // 26

Share This:    Facebook Twitter

Javascript: Predict the value of this argument


this is determined by the calling context, the way in which function is called.

Calling standalone functions directly

When a function is executed as a simple object function directly, this refers to the global object.
function foo() {
   console.log('Hello World!');
   console.log(this);
}

foo();


Calling functions as property of an object reference

Here we have created an object obj, and there is a property on it which is a function. The function is being called as a property on the object. Here this refers to the object obj itself.
var obj = {};

obj.foo = function() {
   console.log('Hello World!');
   console.log(this);
}

obj.foo();

Calling standalone functions using 'new' keyword

When a function is called using the new keyword, this always refer to the newly created object, an empty object.
function foo() {
   console.log('Hello World!');
   console.log(this);
}

new foo();

Share This:    Facebook Twitter

Friday, November 17, 2017

Javascript: Identifying Primitive and Reference Types


Identifying Primitive Types

There are five primitive types in JavaScript:
  • boolean
  • number
  • string
  • null
  • undefined

The best way to identify primitive types is with the typeof operator, which works on any variable and returns a string indicating the type of data.
console.log(typeof "John Doe");   // "string"
console.log(typeof 10);           // "number"
console.log(typeof 5.1);          // "number"
console.log(typeof true);         // "boolean"
console.log(typeof undefined);    // "undefined"

When you run typeof null, the result is "object". The best way to determine if a value is null is to compare it against null directly, like below. Make sure that when you’re trying to identify null, use triple equals so that you can correctly identify the type.
console.log(value === null);    // true or false

Identifying Reference Types

The built-in reference types are
  • Array
  • Date
  • Error
  • Function
  • Object
  • RegExp

A function is the easiest reference type to identify because when you use the typeof operator on a function, the operator should return "function":
function reflect(value) {
 return value;
}
console.log(typeof reflect);   // "function"

Other reference types are trickier to identify because, for all reference types other than functions, typeof returns "object". To identify reference types more easily, you can use JavaScript’s instanceof operator. The instanceof operator takes an object and a constructor as parameters. When the value is an instance of the type that the constructor specifies, instanceof returns true; otherwise, it returns false.
var items = [];
var object = {};

function reflect(value) {
 return value;
}
console.log(items instanceof Array);    // true
console.log(object instanceof Object);    // true
console.log(reflect instanceof Function);   // true

Array.isArray() is the best way to identify arrays.
var items = [];
console.log(Array.isArray(items));    // true

Share This:    Facebook Twitter

Thursday, November 2, 2017

Monday, October 30, 2017

JavaScript: Module Pattern


The module pattern is an object-creation pattern designed to create singleton objects with private data. The basic approach is to use an immediately invoked function expression (IIFE) that returns an object. An IIFE is a function expression that is defined and then called immediately to produce a result. That function expression can contain any number of local variables that aren’t accessible from outside that function. Because the returned object is defined within that function, the object’s methods have access to the data. Methods that access private data in this way are called privileged methods.

Here’s the basic format for the module pattern. In this pattern, an anonymous function is created and executed immediately. (Note the extra parentheses at the end of the function. You can execute anonymous functions immediately using this syntax.) That means the function exists for just a moment, is executed, and then is destroyed.
var yourObject = (function() {

   // private data variables

   return {
      // public methods and properties
   };

}());

The below code creates the person object using the module pattern. The age variable acts like a private property for the object. It can’t be accessed directly from outside the object, but it can be used by the object methods. There are two privileged methods on the object: getAge(), which reads the value of the age variable, and growOlder(), which increments age. Both of these methods can access the variable age directly because it is defined in the outer function in which they are defined.
var person = (function() {

   var age = 25;

   return {
      name: "Nicholas",

      getAge: function() {
         return age;
      },

      growOlder: function() {
         age++;
      }
   };

}());

console.log(person.name);   // "Nicholas"
console.log(person.getAge());   // 25

person.age = 100;
console.log(person.getAge());   // 25

person.growOlder();
console.log(person.getAge());   // 26

Revealing Module Pattern

There is a variation of the module pattern called the revealing module pattern, which arranges all variables and methods at the top of the IIFE and simply assigns them to the returned object. You can write the previous example using the revealing module pattern as follows:
var person = (function() {

   var age = 25;

   function getAge() {
      return age;
   }

   function growOlder() {
      age++;
   }

   return {
      name: "Nicholas",
      getAge: getAge,
      growOlder: growOlder
   };
   
}());
In this pattern, age, getAge(), and growOlder() are all defined as local to the IIFE. The getAge() and growOlder() functions are then assigned to the returned object, effectively "revealing" them outside the IIFE.

Source: The principles of object-oriented JavaScript by Nicholas

Reference: https://coryrylan.com/blog/javascript-module-pattern-basics
Share This:    Facebook Twitter

Sunday, October 29, 2017

Creating Lightweight Integrations with the Force.com REST API

REST API is simple access to Salesforce data and functionality via RESTful endpoints. It uses resource definition and HTTP verbs in a stateless fashion in order to communicate with the system.

Salesforce uses the OAuth protocol to allow users of applications to securely access data without having to reveal username and password credentials.

Before making REST API calls, you must authenticate the application user using OAuth 2.0. To do so, you’ll need to:
  • Set up your application as a connected app (that defines your application’s OAuth settings) in the Salesforce organization. When you develop an external application that needs to authenticate with Salesforce, you need to define it as a new connected app within the Salesforce organization that informs Salesforce of this new authentication entry point.
  • Determine the correct Salesforce OAuth endpoint for your connected app to use. OAuth endpoints are the URLs you use to make OAuth authentication requests to Salesforce.
  • Authenticate the connected app user via one of several different OAuth 2.0 authentication flows. An OAuth authentication flow defines a series of steps used to coordinate the authentication process between your application and Salesforce. Supported OAuth flows include:
    • Web server flow, where the server can securely protect the consumer secret.
    • User-agent flow, used by applications that cannot securely store the consumer secret.
    • Username-password flow, where the application has direct access to user credentials.
After successfully authenticating the connected app user with Salesforce, you’ll receive an access token which can be used to make authenticated REST API calls.

I have created a connected app "Sample Connected App". I have enabled OAuth Settings and entered a Callback URL. Depending on the OAuth flow, this is typically the URL that a user’s browser is redirected to, with either the authorization code or token, after successful authentication. The scopes under Selected OAuth Scopes refer to permissions given by the user running the connected app.

The Consumer Key and Consumer Secret is created which can be used to authenticate your application.

Click on Manage to see additional settings.

I have selected Relax IP Restrictions under IP Relaxation. Now lets go into Postman. I will be posting values, and for that I have to provide data in payload to get back the token. I will be using form-data as I will be providing a number of values. I have set the grant-type as password because I will be using username-password OAuth authentication flow (which is not ideal in most cases). The value for client_id will be the consumer key.

So this says that we have logged-in. Now lets try to get a list of accounts. Create a new request using the instance URL (INSTANCE_URL/services/data/v41.0/sobjects/account) that we received in the response earlier and for Authorization, concatenate Bearer and the access_token. Click the send button, and you will notice the response.

Similarly, you can check the responses for the below request URL:
INSTANCE_URL/services/data/v41.0/sobjects/account/describe
INSTANCE_URL/services/data/v41.0/sobjects/account/0017F00000I5zDl
INSTANCE_URL/services/data/v41.0/query?q=select+name+from+account

You can append .xml or .json to URI to get back the right representation. This works in most cases. If you are doing searches, it doesn't work in this way; in such cases, add "accept" header. The default is JSON if you are working in REST API. Now lets add Accept header to a standard HTTP header.

You can now remove Accept header and then append .xml to URI to get the same reponse.

Reference:
https://developer.salesforce.com/docs/atlas.en-us.api_rest.meta/api_rest/intro_understanding_authentication.htm
https://www.forcetalks.com/salesforce-topic/how-to-do-salesforce-to-salesforce-integration-using-rest-api/
Share This:    Facebook Twitter

Saturday, October 21, 2017

Lightning: Popups / Modal


Few months back, I created a single page application to create and edit broker details in a popup. The code for this app is provided in the github link provided in the reference section of this post.

The popup is invoked on click of New or Edit button. This popup gets created dynamically during runtime for which I have created a helper function displayModal.
displayModal : function(component, modalComponentName, modalProperties) {
    $A.createComponent(
        modalComponentName,
        modalProperties,
        function(newModal, status, errorMessage) {
            if (status === "SUCCESS")
                component.set("v.modal", newModal);
            else if (status === "INCOMPLETE")
                console.log("No response from server or client is offline.")
                else if (status === "ERROR")
                    console.log("Error: " + errorMessage);
        }
    );
}

This is how the helper function is called on click of New button
helper.displayModal(component, "c:BrokerPopup", {
    "broker": {'sobjectType':'Broker__c', 
               'Name':'', 
               'Mobile_Phone__c':'', 
               'Email__c':''
              }
});

To exit the popup, I am setting modal attribute of the component to null like below:
component.set("v.modal", null);

References:
Github link: https://github.com/iamsonal/BrokerApp
Share This:    Facebook Twitter

Friday, October 20, 2017

JavaScript Prototype


Every constructor function has a property on it called prototype which is an object. This prototype object has a property on it called constructor which points back to the original constructor function.

This prototype property can have methods and properties placed on it. These methods and properties are shared and accessible like any object that is created from that constructor function when the new keyword is used. Anytime an object is created using the 'new' keyword, a property called "__proto__" gets created, linking the object and the prototype property of the constructor function.

Lets define a constructor function Person with a property called name.
function Person(name) {
    this.name = name;
}

Functions are basically objects in Javascript. So Person happens to be a function object. Now when Javascript processes functions, it creates 2 objects. The second object that gets created for every function is the prototype object. To access this prototype object, it turns out that a property by the name 'prototype' gets created on function object that points to the prototype object. So to access this property, we will type Person.prototype as below:

This applies to all functions. Now I will create two objects from the constructor function using the new keyword.
var elie = new Person("Elie");
var colt = new Person("Colt");

Since I have used new keyword, a property has been added to each of these objects called __proto__ which points to the prototype object on the Person function constructor.
var elie = new Person("Elie");
var colt = new Person("Colt");

elie.__proto__ === Person.prototype
true

To validate this, we can set a custom property on Person.prototype and try to access it from elie.__proto__
So they are pointing to the same object.

Also, the prototype object has a property on it called constructor which points back to the original function.
Person.prototype.constructor === Person
true

Now let's write some code and use prototype object.
function Person(name, age) {
   this.name = name;
   this.age = age;
}

Person.prototype.eat = function() {
   console.log('I eat');
}

Person.prototype.sleep = function() {
   console.log('I sleep');
}

var elie = new Person('Elie', 20);

Check the output below in your browser console. You will note that Javascript will first search for sleep property in the elie object. If it isn’t there, then JavaScript will search for it in the object’s prototype.

Please note that you used the new keyword to create elie object. If you had invoked the Person function simply like below:
var elie = Person('Elie', 20);

then this is how the constructor should look like:
function Person(name, age) {
   var person = Object.create(Person.prototype);
   person.name = name;
   person.age = age;
   return person;
}

As of ES6, Javascript has now a class keyword. So we can refactor the code as follows:
class Person {
   constructor(name, age) {
      this.name = name;
   this.age = age;
   }

   eat() {
      console.log(this.name + ' eats.');
   }

   sleep() {
      console.log(this.name + ' sleeps.');
   }
}

var elie = new Person('Elie', 20);

This new way is just syntactical sugar over the existing way that we saw earlier. Now let's say that we want to get the prototype of elie. So use Object.getPrototypeOf() and pass in the specific instance of the object like below:
var proto = Object.getPrototypeOf(elie);

NOTE: Arrow functions don't have their own this keyword. As a result, arrow functions cannot be constructor functions, and if you try to invoke an arrow function using new keyword, it will give you an error. And so there is no prototype property in such functions.
const person = () => {}
const elie = new Person()  // Error: Person not a constructor

Person.prototype // undefined

Share This:    Facebook Twitter

Wednesday, October 18, 2017

Callback functions in JavaScript


Synchronous operation
const posts = [
    {title: "Post One", body: "This is post one"},
    {title: "Post Two", body: "This is post two"}
];

function createPost(post) {
    setTimeout(function () {
        posts.push(post);
    }, 2000);
}

function getPosts() {
    setTimeout(function () {
        let output = "";
        posts.forEach(function (post) {
            output += `<li>${post.title}</li>`;
        });
        document.body.innerHTML = output;
    }, 1000);
}

createPost({title: "Post Three", body: "This is post three"});

getPosts();

Asynchronous operation
const posts = [
    {title: "Post One", body: "This is post one"},
    {title: "Post Two", body: "This is post two"}
];

function createPost(post, callback) {
    setTimeout(function () {
        posts.push(post);
        callback();
    }, 2000);
}

function getPosts() {
    setTimeout(function () {
        let output = "";
        posts.forEach(function (post) {
            output += `<li>${post.title}</li>`;
        });
        document.body.innerHTML = output;
    }, 1000);
}

createPost({title: "Post Three", body: "This is post three"}, getPosts);

References:
http://javascriptissexy.com/understand-javascript-callback-functions-and-use-them/
https://houssein.me/javascript/2016/05/10/asynchronous-javascript-callbacks.html
http://callbackhell.com/
https://developer.mozilla.org/en-US/docs/Glossary/Callback_function
Share This:    Facebook Twitter

Saturday, September 30, 2017

Force.com SOAP API and exposing Apex methods as SOAP Web Services

Before going further, please make sure that the user being used has permission to call API. "API Enabled" must be true for the user's profile.

For SOAP web services API testing, I will be using Postman. This is available as a Chrome extension.

As a first step, you issue a login request where you provide the password and token, as a response to which, you get the session ID and the target URL. To authenticate SOAP API users, you need to acquire session ID.

Enter the below SOAP envelope in your postman's request. Take a note of the POST URL, and the Content-Type that has been set to text/xml. We have also added SOAPAction key in headers whose value is ''.

<?xml version="1.0" encoding="utf-8" ?>
<env:Envelope xmlns:xsd="http://www.w3.org/2001/XMLSchema"
    xmlns:xsi="http://www.w3.org/2001/XMLSchema-instance"
    xmlns:env="http://schemas.xmlsoap.org/soap/envelope/">
  <env:Body>
    <n1:login xmlns:n1="urn:enterprise.soap.sforce.com">
      <n1:username>USERNAME</n1:username>
      <n1:password>PASSWORD</n1:password>
    </n1:login>
  </env:Body>
</env:Envelope>

Click on Send button.

We receive a response with status 200 OK. We also get the server URL and the unique session ID.


Now lets query the Account object. Enter the below SOAP envelope in your postman's request. Take a note of the POST URL that we received in our response before.
<?xml version="1.0" encoding="utf-8"?>   
<soapenv:Envelope xmlns:soapenv="http://schemas.xmlsoap.org/soap/envelope/"
   xmlns:urn="urn:enterprise.soap.sforce.com">
  <soapenv:Header>
     <urn:SessionHeader>
        <urn:sessionId>00D1I000001VVPg!ARQAQG3Y4rBp.E79acFggyFeSd8EgnlnhSRB0B4r1UidUhvUr43ulP9MxwX6aKmhQhrnH_fDwEQaB51twKme7tPGn4kFo5Xr</urn:sessionId>
     </urn:SessionHeader>
  </soapenv:Header>
  <soapenv:Body>
     <urn:query>
        <urn:queryString>SELECT Id, Name FROM Account</urn:queryString>
     </urn:query>
  </soapenv:Body>
</soapenv:Envelope>


Lets retrieve server timestamp. Note that I am just changing the SOAP payload.

Lets create an account. Enter the below SOAP envelope in your postman's request.
<?xml version="1.0" encoding="utf-8"?>   
<soapenv:Envelope xmlns:soapenv="http://schemas.xmlsoap.org/soap/envelope/"
  xmlns:urn="urn:enterprise.soap.sforce.com"
  xmlns:urn1="urn:sobject.enterprise.soap.sforce.com"
  xmlns:xsi="http://www.w3.org/2001/XMLSchema-instance">
  <soapenv:Header>
     <urn:SessionHeader>
        <urn:sessionId>00D1I000001VVPg!ARQAQG3Y4rBp.E79acFggyFeSd8EgnlnhSRB0B4r1UidUhvUr43ulP9MxwX6aKmhQhrnH_fDwEQaB51twKme7tPGn4kFo5Xr</urn:sessionId>
     </urn:SessionHeader>
  </soapenv:Header>
  <soapenv:Body>
     <urn:create>
        <urn:sObjects xsi:type="urn1:Account"> <!--Zero or more repetitions:-->
           <!--You may enter ANY elements at this point-->
           <Name>Test Account</Name>
        </urn:sObjects>
     </urn:create>
  </soapenv:Body>
</soapenv:Envelope>


Exposing Apex Methods as SOAP Web Services

Apex class methods can be exposed as custom SOAP Web service calls. Use the webservice keyword to define these methods.
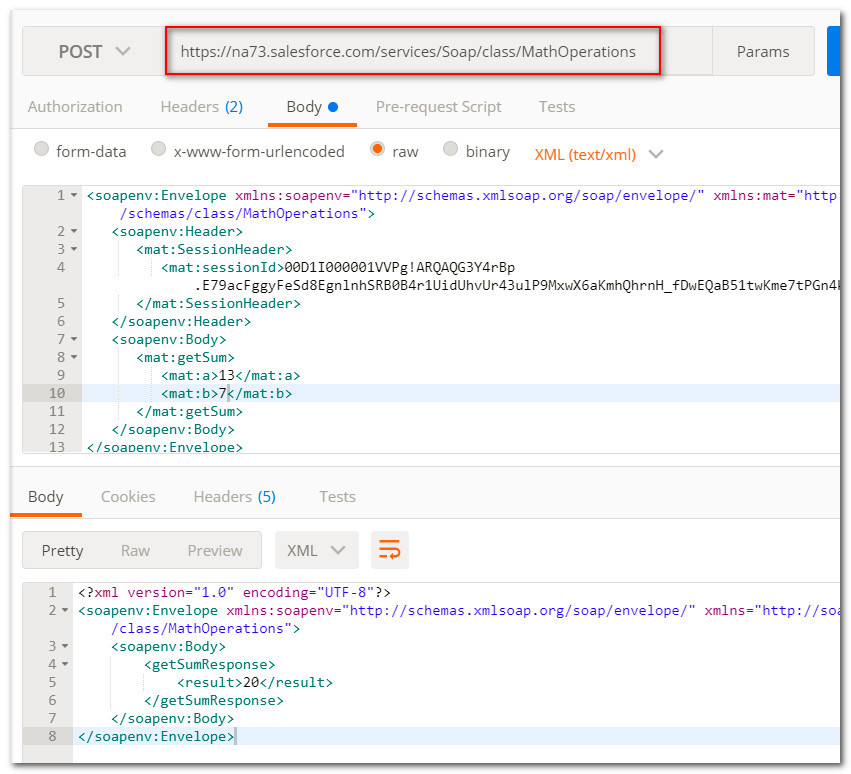
global class MathOperations {
    webservice static Integer getSum (Integer a, Integer b) {
        return a + b;
    }
}

Enter the below SOAP envelope in your postman's request. Take a note of the POST URL


Share This:    Facebook Twitter

Friday, September 22, 2017

Salesforce Lightning: Google Places Autocomplete Predictions Search


I have created a lookup component which on entering few characters of a location will display location predictions.

There are 3 methods that has been defined in client-side controller:
  • keyPressController: executed when the user enters a search key. I have taken into consideration that the user need to enter at least 3 characters to fetch the location predictions.
  • selectOption: executed when the user selects a value from the list box
  • clear: executed on click of cross icon to remove the selected value from the lookup

To fetch the results, I am calling Place Autocomplete service, a part of the Google Places API Web Service, using the below Apex method, which returns location predictions in response to this HTTP request. For more details about this web service, please check the link in the references section of this post.
@AuraEnabled
public static string getAddressAutoComplete(String input, String types) {
    String url = 'https://maps.googleapis.com/maps/api/place/autocomplete/json?input='
            + EncodingUtil.urlEncode(input, 'UTF-8')
            + '&types=' + types
            + '&key=' + GoogleMapsController.getGoogleMapsAPIKey();
    return GoogleMapsController.getHttp(url);
}

The response which is in JSON format is parsed in Javascript in the helper method of the component as below:
displayOptionsLocation: function (component, searchKey) {
    var action = component.get("c.getAddressAutoComplete");
    action.setParams({
        "input": searchKey,
        "types": '(regions)'
    });

    action.setCallback(this, function (response) {
        var state = response.getState();
        if (state === "SUCCESS") {
            var options = JSON.parse(response.getReturnValue());
            var predictions = options.predictions;
            var addresses = [];
            if (predictions.length > 0) {
                for (var i = 0; i < predictions.length; i++) {
                    addresses.push(
                        {
                            value: predictions[i].types[0],
                            label: predictions[i].description
                        });
                }
                component.set("v.filteredOptions", addresses);
            }
        }
    });
    $A.enqueueAction(action);
}

The look and feel of this component is controlled by $A.util.addClass and $A.util.removeClass methods.

Please check the github link for the component code below:
https://github.com/iamsonal/GoogleMapsAutocomplete

References:
https://developers.google.com/places/web-service/autocomplete
Share This:    Facebook Twitter

Friday, September 8, 2017

Salesforce Lightning: Lookup Component


I created a simple lookup component in Lightning. Its fully based on Lightning Design Systems. You can check the Github link in the reference section. During initialization, the component query for the list of strings (using apex code) to be displayed and store in an attribute. So when the user enters a search keyword, the request won't go to Salesforce again and will query the Javascript string array for the filtered results.

How to use?

From your Lightning component, add a lookup component using the following markup:
<c:DemoLookup placeholder="Enter partner Name" actionMethod="c.getAccountOptions"/>

You need to pass a list of strings which will get displayed in the lookup options when the user enters an input. A sample method is as below:
@AuraEnabled
public static List<String> getAccountOptions() {
    List<String> options = new List<String>();
    for (Account a : [
            SELECT Name
            FROM Account
            LIMIT 100
    ]) {
        options.add(a.Name);
    }
    return options;
}

Reference:
https://github.com/iamsonal/DemoLookup
Share This:    Facebook Twitter

Saturday, September 2, 2017

Lightning: Fetch current location details using Google Maps API

Using Google Maps, I was trying to fetch the current city and other details in a Lightning component using Javascript, but I was getting some error in browser console. I believe that is because of Locker service as described in the reference link. So I had to take a different approach.

But first, we need the latitude and longitude of the user who is accessing the Lightning page. The HTML Geolocation API is used to get the geographical position of a user. Since this can compromise privacy, the position is not available unless the user approves it. The getCurrentPosition() method is used to return the user's position. The example below returns the latitude and longitude of the user's position.

checkGeoLocation : function(component, event, helper) {
    if (navigator.geolocation) {
        navigator.geolocation.getCurrentPosition(function(position) {
            var lat = position.coords.latitude;
            var lon = position.coords.longitude;
            var action = component.get("c.getCityName");
            action.setParams({
                "latitude": lat,
                "longitude": lon
            });
            action.setCallback(this, function(response) {
                var state = response.getState();
                if (state === "SUCCESS") {
                    var location = response.getReturnValue();
                }
            });
            $A.enqueueAction(action);
        });
    } else {
        console.log('Your browser does not support GeoLocation');
    }
}

To fetch the city details, we need to invoke the Google maps API. We need to send the location details as parameters. The results element in the response needs to be parsed in Apex to extract the desired values. In my case, JsonReader class did the work for me.

Please go through the documentation of Google maps, the link of which has been provided in the reference section. The following fields of the results element are of significance:
1. address_components[]
2. types[]

@AuraEnabled
public static String getCityName (Decimal latitude, Decimal longitude) {
    String url = 'http://maps.googleapis.com/maps/api/geocode/json?latlng=' + latitude + ',' + longitude + '&sensor=true';
    JsonReader jsonobj = new JsonReader(getHttp(url));
    String status = jsonObj.getString('status');
    System.debug(status);
    
    JsonReader addressComponentObj = null;
    String locality= null;
    String adminAreaLevel2= null;
    List<Object> types = null;
    
    for(Object obj : jsonObj.getList('results[0].address_components')) {
        addressComponentObj = new JsonReader(obj);
        types = addressComponentObj.getList('types');
        for(Object typeObj : types) {
            String type = (String) typeObj;
            if (type.equalsIgnoreCase('locality')) {
                locality = addressComponentObj.getString('long_name');
            }
            if (type.equalsIgnoreCase('administrative_area_level_2')) {
                adminAreaLevel2 = addressComponentObj.getString('short_name');
            }
        }
    }
    return (locality + ', ' + adminAreaLevel2);
}

And that's it.


Reference: http://www.rattanpal.com/2017/03/19/salesforce-implement-google-maps-lightning-components/
https://developers.google.com/maps/documentation/geocoding/intro
Share This:    Facebook Twitter

Saturday, August 26, 2017

Salesforce Lightning Interview Questions I


1. What are the different types of Lightning events?
  • Browser: browser notifications that are triggered by user interaction with an element. Eg. onClick
  • System: fired by LC framework during LC lifecycle. They notify component states. Eg. init, render, afterRender
  • Navigation: force:navigateToURL, force:createRecord, force:editRecord
  • Component: A component event is fired from an instance of a component. A component event can be handled by the component that fired the event or by a component in the containment hierarchy that receives the event.
  • Application: Application events follow a traditional publish-subscribe model. An application event is fired from an instance of a component. All components that provide a handler for the event are notified.


2. How to register, fire and handle a component and application event?
<aura:registerEvent name="componentEventFired" type="c:compEvent"/>
<aura:registerEvent name="appEvent" type="c:appEvent"/>

var compEvents = cmp.getEvent("componentEventFired");
compEvents.setParams({ "context" : parentName });
compEvents.fire();

var appEvent = $A.get("e.c:appEvent");
appEvent.setParams({ "context" : parentName });
appEvent.fire();
...
...
...
...
...
<aura:handler event="c:appEvent" action="{!c.handleApplicationEventFired}"/>
<aura:handler name="componentEventFired" event="c:compEvent" 
 action="{!c.handleComponentEventFired}"/>

{
 handleComponentEventFired : function(cmp, event) {
  var context = event.getParam("context");
 },

 handleApplicationEventFired : function(cmp, event) {
  var context = event.getParam("context");
 }
}
For more details, check the link below:
http://hellosnl.blogspot.in/2017/06/lightning-advanced-events-example.html


3. Let's say that you have an app myApp.app that contains a component myCmp.cmp with a ui:button component. During initialization, the init() event is fired in what order?
Answer: ui:button, ui:myCmp, and myApp.app.


4. Why do we use @AuraEnabled annotation?
  • Use @AuraEnabled on Apex class static methods to make them accessible as remote controller actions in your Lightning components.
  • Use @AuraEnabled on Apex instance methods and properties to make them serializable when an instance of the class is returned as data from a server-side action

5. Why do we use $A.enqueueAction(action)?
It adds the server-side controller action to the queue of actions to be executed. Rather than sending a separate request for each individual action, the framework processes the event chain and batches the actions in the queue into one request. The actions are asynchronous and have callbacks.


6. What is Namespace?
It is used to group related components together.


7. What is LockerService?
It enhances security by isolating Lightning components in their own namespace. A component can only traverse the DOM and access elements created by a component in the same namespace.


8. Examples of how to use some of the out-of-the-box events to enable component interation within your Lightning components?
$A.get("e.force:refreshView").fire(): reloads all data for the view.

createRecord : function (component, event, helper) {
    var createRecordEvent = $A.get("e.force:createRecord");
    createRecordEvent.setParams({
        "entityApiName": "Contact"
    });
    createRecordEvent.fire();
}

editRecord : function(component, event, helper) {
    var editRecordEvent = $A.get("e.force:editRecord");
    editRecordEvent.setParams({
         "recordId": component.get("v.contact.Id")
   });
    editRecordEvent.fire();
}


9. What is Lightning CLI?
It is a Heroku Toolbelt plugin that lets you scan your code for general JavaScript coding issues and lightning-specific issues.


10. Difference between bound and unbound expressions.
Bound expression {!expression}
  • Any change to the value of the childAttr attribute in c:child also affects the parentAttr attribute in c:parent and vice versa.
  • When you use a bound expression, a change in the attribute in the parent or child component triggers the change handler in both components.
Unbound expression {#expression}
  • Any change to the value of the childAttr attribute in c:child doesn’t affect the parentAttr attribute in c:parent and vice versa.
  • When you use an unbound expression, the change is not propagated between components so the change handler is only triggered in the component that contains the changed attribute.
For more details, check this link: http://hellosnl.blogspot.in/2017/05/data-binding-between-components.html


11. Use of THIS CSS class?
This adds namespacing to CSS and helps prevent one component's CSS from blowing away another component's styling.


12. How to set the value of an inherited attribute?
Use the <aura:set> tag.


13. What are the different ways to conditionally display markup, and what is the preferred approach?
Using the <aura:if> tag
Use CSS to toggle visibility of markup by calling $A.util.toggleClass(cmp, 'class') in JavaScript code.


14. What is $Resource global value provider? Is it possible to obtain a reference to a static resource in Javascript code?
It lets you reference images, style sheets, and JavaScript code you’ve uploaded in static resources.
To obtain a reference to a static resource in JavaScript code, use $A.get('$Resource.resourceName').
For more details, check this link http://hellosnl.blogspot.in/2017/04/lightning-using-static-resources.html


15. Let’s say you have several buttons that reuse the same onclick handler. How will you retrieve the name of the button that fired the event?
http://hellosnl.blogspot.in/2017/05/which-button-was-pressed.html


16. What are the names of interfaces that are added to a Lightning component to allow it to be used as custom tabs, and to be used in Lightning and Community builder?
http://hellosnl.blogspot.in/2017/05/configuring-lightning-components.html


17. What is the use of force:hasRecordId interface?
Add the force:hasRecordId interface to a Lightning component to enable the component to be assigned the ID of the current record.
The recordId attribute is set only when you place or invoke the component in a context of a record. For example, when you place the component on a record page, or invoke it as an action from a record page or object home. In all other cases, such as when you create this component programmatically inside another component, recordId isn’t set, and your component shouldn’t depend on it.


18. How to delete a design attribute for a component that implements the flexipage:availableForAllPageTypes or forceCommunity:availableForAllPageTypes interface?
First remove the interface from the component before deleting the design attribute. Then reimplement the interface. If the component is referenced in a Lightning page, you must remove the component from the page before you can change it.


19. How to add Lightning components to your Visualforce pages?
https://developer.salesforce.com/docs/atlas.en-us.lightning.meta/lightning/components_visualforce.htm


Share This:    Facebook Twitter

Friday, August 25, 2017

Javascript Accessor Properties

There are two different types of properties: data properties and accessor properties.

  • Data properties contain a value.
  • Accessor properties don’t contain a value but instead define a getter function and a setter function.
const person1 = {
   _name: "Nicholas",

   get name() {
      console.log("Reading name");
      return this._name;
   },

   set name(value) {
      console.log("Setting name to %s", value);
      this._name = value;
   }
};

console.log(person1.name);   // "Reading name" then "Nicholas"

person1.name = "Greg";
console.log(person1.name);   // "Setting name to Greg" then "Greg"

This example defines an accessor property called name. There is a data property called _name that contains the actual value for the property.

The leading underscore is a common convention to indicate that the property is considered to be private, though in reality it is still public. The syntax used to define the getter and setter for name looks a lot like a function but without the function keyword. The special keywords get and set are used before the accessor property name, followed by parentheses and a function body.

Share This:    Facebook Twitter

Javascript Object properties

Detecting Properties

The in operator looks for a property with a given name in a specific object and returns true if it finds it.

console.log("name" in person1);   // true
console.log("age" in person1);    // true
console.log("title" in person1);  // false

Keep in mind that methods are just properties that reference functions, so you can check for the existence of a method in the same way.

const person1 = {
   name: "Nicholas",
   sayName: function() {
      console.log(this.name);
   }
};

console.log("sayName" in person1);  // true

In some cases, however, you might want to check for the existence of a property only if it is an own property. The in operator checks for both own properties and prototype properties, so you’ll need to take a different approach. Enter the hasOwnProperty() method, which is present on all objects and returns true only if the given property exists and is an own property.

const person1 = {
   name: "Nicholas",
   sayName: function() {
      console.log(this.name);
   }
};

console.log("name" in person1);                         // true
console.log(person1.hasOwnProperty("name"));            // true

console.log("toString" in person1);                     // true
console.log(person1.hasOwnProperty("toString"));        // false

Removing Properties

You need to use the delete operator to completely remove a property from an object.

const person1 = {
   name: "Nicholas"
};

console.log("name" in person1);  // true

delete person1.name;             // true - not output
console.log("name" in person1);  // false
console.log(person1.name);       // undefined

Enumeration

By default, all properties that you add to an object are enumerable, which means that you can iterate over them using a for-in loop. This example uses bracket notation to retrieve the value of the object property and output it to the console, which is one of the primary use cases for bracket notation in JavaScript.

var property;

for (property in object) {
   console.log("Name: " + property);
   console.log("Value: " + object[property]);
}

If you just need a list of an object’s properties, use Object.keys() method to retrieve an array of enumerable property names. Typically, you would use Object.keys() in situations where you want to operate on an array of property names and for-in when you don’t need an array.

var properties = Object.keys(object);

// if you want to mimic for-in behavior
var i, len;

for (i=0, len=properties.length; i < len; i++){
   console.log("Name: " + properties[i]);
   console.log("Value: " + object[properties[i]]);
}

Keep in mind that not all properties are enumerable. You can check whether a property is enumerable by using the propertyIsEnumerable() method, which is present on every object:

var person1 = {
   name: "Nicholas"
};

console.log("name" in person1);    // true
console.log(person1.propertyIsEnumerable("name"));  // true

var properties = Object.keys(person1);

console.log("length" in properties);    // true
console.log(properties.propertyIsEnumerable("length")); // false
Share This:    Facebook Twitter

How to access map value in lightning component

Scenario: I have to create a picklist in Lightning, the values of which will be fetched from an already defined custom setting. The Apex method will be returning a map of values.

Define a method in Apex class SampleController which will return a map of values.
@AuraEnabled
public static Map<String, String> getselectOptions() {
    Map<String, CustomSettingName__c> values = CustomSettingName__c.getAll();
    Map<String, String> options = new Map<String, String>();
    
    for (String key: values.keyset()) {
        options.put(key, values.get(key).CustomSetting_Column__c);
    }
    return options;
}

Now in client side controller, create a new array optionsList. Add the values to this new array from the response object returned.
var optionsList = [];
for (var key in response) {
    if (response.hasOwnProperty(key)) {
        optionsList.push({value: key, label: response[key]});
    }
};
component.set('v.optionsList', optionsList);

Once the array is populated with the values, using aura:iteration tag populate the picklist values as below:
<aura:component controller="SampleController">
    
    <aura:attribute name="optionsList" type="List"/>

    <lightning:select name="selectItem" label="text" onchange="{!c.checkOptionValue}" value="{!v.partnerTypeSelected}" >
        <aura:iteration items="{!v.optionsList}" var="option">
            <option value="{!option.value}" text="{!option.label}" 
                    selected="{!option.selected}">
            </option>
        </aura:iteration>
    </lightning:select>
    
</aura:component>

Share This:    Facebook Twitter

Monday, August 14, 2017

Salesforce Security: Concepts

Salesforce Security Layers

  1. Organization: Login IP ranges, Login hours; when where how can a user login to the org
  2. Object: Object-level security; what action can a user have on a specific object
  3. Field: Field-level security; what field can a user read/edit
  4. Record: Sharing; what records can a user access

From an architect’s perspective, data access in Salesforce falls into 2 main categories:

  • Object-level access, which includes field-level access
  • Record-level access

Profiles and Permission Sets determine the object level security access to each object in Salesforce.

Read object-level security doesn't give Read access to all account records, it only gives the ability to read account records.

Profiles

A profile contains the baseline permissions of a user, and each user is assigned only 1 profile. It defines a user’s ability to peform different functions, access records, and the way the records are displayed. Profiles are tied to a user license.

Enhanced profile user interface lets you search for any setting and it can take you to this setting page. This can be set up in Setup —> User Management Settings.

Permission Set

A permission set is a collection of permissions that can be assigned to a user extending users’ functional access without changing their profiles. Users can have only one profile but they can have multiple permission sets.

Permission Set Group (PSG): It is a collection of permission sets. Users with a PSG receive the combined permissions of all the permission sets in the group. You can also remove individual permissions from a group with the muting feature, to further customize the group. Please note that a PSG can only contain 1 muting permission set that is created within the group.

A profile doesn’t provide the appropriate mechanism for scalable permission assignment. Permission sets and PSG are used to avoid the creation of many different profiles that are only slightly different.

List of permissions that are missing in a permission set

  • Page layout assignment
  • Login hours and Login IP ranges
  • Desktop client access
  • Session settings
  • Password policies
  • Delegated Authentication
  • 2-factor authentication with SSO
  • Organization-wide email addresses are assignable by profiles only
  • Default record type per object
  • Profile specific search layouts

Record Ownership

Every record must be owned by a single user or queue. The owner has access to the record, based on the object settings of the owner’s profile. Queue members and users higher in a role hierarchy can access queues from list views and take ownership of records in a queue.

Record ownership and full access are synonymous and interchangeable and provide the user with the highest level of access to a record.

Sharing (record-level access)

Record-level access determines which records a user can see for a specific object. Object-level security should allow to access this record.

  • Organization-Wide Defaults
  • Role Hierarchy
  • Sharing Rules
  • Manual Sharing
  • Team Sharing
  • Territory Hierarchy Access

For each object, the View All and Modify All permissions ignore sharing rules and settings.

View All Data and Modify All Data administrative permissions apply to all objects’ records.

Organization-wide Defaults (OWD)

OWD sharing settings specify the default level of access users have to each others’ records. OWD are the only way to restrict record access. You use OWD settings to lock down your data to the most restrictive level, and then use other sharing tools to selectively give access to other users. For each object, the OWD can be:

  • Private
  • Public read only
  • Public read/write
  • Public read/write/transfer: available for cases and leads
  • Public full access: available for campaigns
  • Controlled by parent

Role Hierarchy

Users can access the data of all the users directly below them in the hierarchy (subordinates) using the Grant Access Using Hierachies option. Managers gain as much access as their subordinates. This access applies to records owned by users, as well as records shared with them.

Public Group

A public group is a collection of individual users, roles, territories, and so on, that all have a function in common.

Groups can be nested (group A nested into group B), but keep in mind that nesting has an impact on group maintenance and performance due to group membership calculation. Don’t nest more than 5 levels. As a best practice, keep the total number of public groups for an organization to 100,000.

Sharing Rules

They allow for exceptions to OWD settings and the role hierarchy that give additional users access to records they don’t own. There are 2 types of sharing rules:

  1. Ownership-based: records are shared following criteria based on their owner. For example, share all opportunities owned by user A with Group B. As a best practice, keep the number of ownership-based rules per object to 1000.
  2. Criteria-based: they provide access to records based on the record’s field values.

Manual Sharing

Gives user the flexibility to share specific records with users that need to see them. To grant access to a record, you must be one of the following users:

  • The record owner
  • A user in a role above in the hierarchy
  • Any user granted Full Access to the record
  • An administrator

Team Sharing

For accounts, opportunities and cases, record owners can use teams to allow other users access to their records. The record owner adds team members and specifies the level of access each team member has to the record, so that some team members can have read-only access and others can have read-write access. The record owner can also specify a role for each team member.

Share This:    Facebook Twitter

Sunday, August 13, 2017

Using Dynamic Apex to retrieve Picklist Values

USECASE: Fetch the picklist values from Industry field of Account sObject.

List<SelectOption> options = new List<SelectOption>();

Schema.DescribeFieldResult fieldResult = Account.Industry.getDescribe();
List<Schema.PicklistEntry> picklistEntries = fieldResult.getPicklistValues();

for (Schema.PicklistEntry picklistEntry : picklistEntries) {
    options.add(new SelectOption(picklistEntry.getLabel(), picklistEntry.getValue()));
}

return options;

OR

List<SelectOption> options = new List<SelectOption>();

Map<String, Schema.SObjectField> fieldMap = Account.getSObjectType().getDescribe().fields.getMap();
List<Schema.PicklistEntry> picklistEntries = fieldMap.get('Industry').getDescribe().getPickListValues();

for (Schema.PicklistEntry picklistEntry : picklistEntries) {
    options.add(new SelectOption(picklistEntry.getLabel(), picklistEntry.getValue()));
}

return options;

Share This:    Facebook Twitter

DescribeSObjectResult: Check whether the object is Custom or Standard


List<String> allCustomObjsList = new List<string>();
List<String> allStandardObjsList = new List<string>();

for(Schema.SobjectType obj : Schema.getGlobalDescribe().values()) {
    Schema.DescribeSobjectResult objResult = obj.getDescribe();
    if(objResult.isCustom()) {
        String strObjName =objResult.getname();
        allCustomObjsList.add(strObjName);
    }
    else {
        String strObjName =objResult.getname();
        allStandardObjsList.add(strObjName);
    }
}

System.debug('Custom Objects List: ' +allCustomObjsList);
System.debug('Standard Objects List: ' +allStandardObjsList);

If you need to check for a specific object, execute the below code:
Schema.DescribeSObjectResult describeAccount = Schema.sObjectType.Account;
System.debug(describeAccount.isCustom());

Similarly you can use other methods for describing sObjects, the list of which can be found below:
https://developer.salesforce.com/docs/atlas.en-us.apexcode.meta/apexcode/apex_methods_system_sobject_describe.htm

Share This:    Facebook Twitter

Fetch recordType Name and recordTypeId without SOQL

To avoid SOQL Limit we can use dynamic apex to get RecordTypeId. We can get a particular RecordTypeId of a particular sObject or get all recordTypeid of one sobejct in a map.

global class RecordTypeUtils {
    
    //Method to get the recordTypeId 
    public static Id recordTypeId(string obj,string recName){
        Id recTypeId;
        if(obj!= null && recName != null){
            recTypeId= Schema.getGlobalDescribe().get(obj).getDescribe().getRecordTypeInfosByName().get(recName).getRecordTypeId();
        }  
        return recTypeId;  
    }
    
    //Method to get the map of recordType Name as key and recordTypeId as value 
    public static Map<String,Id> recordTypeMap(string obj){
        Map<String,Id> recTypeNameWithIdMap=new Map<String,Id>();
        if(obj!= null){
            for(Schema.RecordTypeInfo recInfo : Schema.getGlobalDescribe().get(obj).getDescribe().getRecordTypeInfosByName().values()){
                recTypeNameWithIdMap.put(recInfo.getName(),recInfo.getRecordTypeId());
            }
        }
        return recTypeNameWithIdMap;
    } 
}

I created a record type "NewLabel" on Account object. Enter the below Apex code in Execute Anonymous window and check the output:

Map<String,Id> recTypeIdMap=RecordTypeUtils.recordTypeMap('Account');
System.debug(recTypeIdMap);
Id recId=RecordTypeUtils.recordTypeId('Account','NewLabel');
System.debug(recId);

Id recordTypeId = Schema.SObjectType.Account.getRecordTypeInfosByName().get('NewLabel').getRecordTypeId(); 
System.debug(recordTypeId);

Note that values of recId and recordTypeId in your output is same.

Check the link below to check a utility class that performs the query against the RecordType object
https://interactiveties.com/blog/2016/recordtype-utility-class.php
Share This:    Facebook Twitter

Saturday, August 12, 2017

Apex: Get sObject details using ID

Id id = 'a0M7F000000qXgg';
Schema.sObjectType objType = id.getSObjectType();
Schema.DescribeSObjectResult objDescribe = objType.getDescribe();

System.debug(objDescribe.getName());

Similarly, you can get other sObject details using the methods described in the link below:
https://developer.salesforce.com/docs/atlas.en-us.apexcode.meta/apexcode/apex_methods_system_sobject_describe.htm
Share This:    Facebook Twitter

Dynamic SOQL and SOSL

To create a dynamic SOQL query at run time, use the database query method. Check the reference link for more details.
List<sObject> sobjList = Database.query(string);

To create a dynamic SOSL query at run time, use the search query method. For example:
String searchquery = 'FIND \'Edge*\' IN ALL FIELDS RETURNING Account(Id, Name), Contact, Lead';
List<List<SObject>>searchList = search.query(searchquery);

To prevent SOSL injection, use the escapeSingleQuotes method. This method adds the escape character (\) to all single quotation marks in a string that is passed in from a user. The method ensures that all single quotation marks are treated as enclosing strings, instead of database commands.
fieldList = (fieldList!=null) ? String.escapeSingleQuotes(fieldList) : fieldList;

References:
http://metillium.com/2016/03/variable-binding-in-dynamic-soql/
Share This:    Facebook Twitter

Salesforce Custom Settings

Custom settings are similar to custom objects and enable application developers to create custom sets of data, as well as create and associate custom data for an organization, profile, or specific user. Custom Settings data is stored in the application cache, which enables efficient access without the cost of multiple repeated queries to the database. As long as you query the Custom Settings using GET methods rather than an SOQL query you can retrieve all of the values with literally zero impact on the governor’s count of the number of queries performed or rows retrieved.

List Custom Settings

It provides a reusable set of static data that can be accessed across your organization. Data in list settings does not vary with profile or user, but is available organization-wide.

The following are instance methods for list custom settings.
  • getAll(): Returns a map of the data sets defined for the custom setting.
  • getInstance(dataSetName) / getValues(dataSetName): Returns the custom setting data set record for the specified data set name.


Hierarchy Custom Settings

It uses a built-in hierarchical logic that lets you "personalize" settings for specific profiles or users. The hierarchy logic checks the organization, profile, and user settings for the current user and returns the most specific value. In the hierarchy, settings for an organization are overridden by profile settings, which, in turn, are overridden by user settings.

References:
http://www.brcline.com/blog/salesforce-custom-settings
https://developer.salesforce.com/docs/atlas.en-us.apexcode.meta/apexcode/apex_methods_system_custom_settings.htm
Share This:    Facebook Twitter

Tuesday, August 1, 2017

Lightning Component for attaching files using input file component

A rough markup of this component using input type file component. Please refer the previous article to get an idea of how the helper JS and the apex class is formed.

<div class="slds-form-element">
    <span class="slds-form-element__label" id="file-selector-id">Attachment</span>
    <div class="slds-form-element__control">
        <div class="slds-file-selector slds-file-selector_files">
            <div class="slds-file-selector__dropzone">
                <input type="file" class="slds-file-selector__input slds-assistive-text" accept="image/png" id="file-upload-input-01" aria-describedby="file-selector-id" aura:id="file" onchange="{!c.showfile}"/>
                <label class="slds-file-selector__body" for="file-upload-input-01">
                    <span class="slds-file-selector__button slds-button slds-button_neutral">
                        <c:svgIcon class="slds-button__icon slds-button__icon_left" xlinkHref="/resource/slds232/assets/icons/utility-sprite/svg/symbols.svg#upload" />
                        Upload Files
                    </span>
                    <span class="slds-file-selector__text slds-medium-show">or Drop Files</span>
                </label>
            </div>
        </div>
    </div>
</div>

showfile:function(component,event,helper){
    helper.show(component,event);
    
    var f = event.target.files[0]; 
    var fileInput = component.find("file").getElement();
    var file = fileInput.files[0];
    
    var reader = new FileReader();
    reader.onloadend = function(e) {
        var contents = e.target.result;
        var base64Mark = 'base64,';
        var dataStart = contents.indexOf(base64Mark) + base64Mark.length;
        var fileContents = contents.substring(dataStart);
        
        helper.upload(component, file, encodeURIComponent(fileContents), function(answer) {
            if (answer) {
                helper.hide(component,event);
            }
            else{
            }
        });
    }
    reader.readAsDataURL(file);
}

Share This:    Facebook Twitter

Lightning Component for attaching files using lightning:input


<aura:component description="FileUploader" controller="FileUploadController">
    <aura:attribute name="fileToBeUploaded" type="Object[]"/>
    <lightning:spinner aura:id="mySpinner" class="slds-hide"/>
    
    <div class=" slds-box">
        <div class="slds-grid slds-wrap">
            <lightning:input aura:id="file-input" type="file"
                             files="{!v.fileToBeUploaded}"
                             onchange="{!c.onFileUploaded}"
                             accept="application/vnd.openxmlformats-officedocument.spreadsheetml.sheet"
                             label="Attachment"
                             name="file" multiple="true"/>
        </div>
    </div>
</aura:component>

({
    onFileUploaded:function(component,event,helper){
        helper.show(component,event);
        var files = component.get("v.fileToBeUploaded");
        if (files && files.length > 0) {
            var file = files[0][0];
            var reader = new FileReader();
            reader.onloadend = function() {
                var dataURL = reader.result;
                var content = dataURL.match(/,(.*)$/)[1];
                helper.upload(component, file, content, function(answer) {
                    if (answer) {
                        helper.hide(component,event);
                        // Success
                    }
                    else{
                        // Failure
                    }
                });
            }
            reader.readAsDataURL(file);
        }
        else{
            helper.hide(component,event);
        }
    }
})

({
    upload: function(component, file, base64Data, callback) {
        var action = component.get("c.uploadFile");
        console.log('type: ' + file.type);
        action.setParams({
            fileName: file.name,
            base64Data: base64Data,
            contentType: file.type
        });
        action.setCallback(this, function(a) {
            var state = a.getState();
            if (state === "SUCCESS") {
                callback(a.getReturnValue());
            }
        });
        $A.enqueueAction(action);
    },
    show: function (cmp, event) {
        var spinner = cmp.find("mySpinner");
        $A.util.removeClass(spinner, "slds-hide");
        $A.util.addClass(spinner, "slds-show");
    },
    hide:function (cmp, event) {
        var spinner = cmp.find("mySpinner");
        $A.util.removeClass(spinner, "slds-show");
        $A.util.addClass(spinner, "slds-hide");
    }
})

public class FileUploadController {
    @AuraEnabled
    public static Id uploadFile(String fileName, String base64Data, String contentType) { 
        base64Data = EncodingUtil.urlDecode(base64Data, 'UTF-8');
        Attachment a = new Attachment();
        a.parentId = '0017F000007xoiVQAQ';
        a.Body = EncodingUtil.base64Decode(base64Data);
        a.Name = fileName;
        a.ContentType = contentType; 
        insert a;
        System.debug(a.Id);
        return a.Id;
    }
}

NOTE: For demo purpose, I have hardcoded the value of an account '0017F000007xoiVQAQ' in the apex class. In actual scenario, you should get this ID from the component.
Share This:    Facebook Twitter

Total Pageviews

My Social Profiles

View Sonal's profile on LinkedIn

Blog Archive

Tags

__proto__ $Browser Access Grants Accessor properties Admin Ajax AllowsCallouts Apex Apex Map Apex Sharing AssignmentRuleHeader AsyncApexJob Asynchronous Auth Provider AWS Callbacks Connected app constructor Cookie CPU Time CSP Trusted Sites CSS Custom settings CustomLabels Data properties Database.Batchable Database.BatchableContext Database.query Describe Result Destructuring Dynamic Apex Dynamic SOQL Einstein Analytics enqueueJob Enterprise Territory Management Enumeration escapeSingleQuotes featured Flows geolocation getGlobalDescribe getOrgDefaults() getPicklistValues getRecordTypeId() getRecordTypeInfosByName() getURLParameters Google Maps Governor Limits hasOwnProperty() Heap Heap Size IIFE Immediately Invoked Function Expression Interview questions isCustom() Javascript Javascript Array jsForce Lightning Lightning Components Lightning Events lightning-record-edit-form lightning:combobox lightning:icon lightning:input lightning:select LockerService Lookup LWC Manual Sharing Map Modal Module Pattern Named Credentials NodeJS OAuth Object.freeze() Object.keys() Object.preventExtensions() Object.seal() Organization Wide Defaults Override PDF Reader Performance performance.now() Permission Sets Picklist Platform events Popup Postman Primitive Types Profiles Promise propertyIsEnumerable() prototype Query Selectivity Queueable Record types Reference Types Regex Regular Expressions Relationships Rest API Rest Operator Revealing Module Pattern Role Hierarchy Salesforce Salesforce Security Schema.DescribeFieldResult Schema.DescribeSObjectResult Schema.PicklistEntry Schema.SObjectField Schema.SObjectType Security Service Components Shadow DOM Sharing Sharing Rules Singleton Slots SOAP API SOAP Web Services SOQL SOQL injection Spread Operator Star Rating stripInaccessible svg svgIcon Synchronous this Token Triggers uiObjectInfoApi Upload Files VSCode Web Services XHR
Scroll To Top