Before going further, please make sure that the user being used has permission to call API. "API Enabled" must be true for the user's profile.
For SOAP web services API testing, I will be using Postman. This is available as a Chrome extension.
As a first step, you issue a login request where you provide the password and token, as a response to which, you get the session ID and the target URL. To authenticate SOAP API users, you need to acquire session ID.
Enter the below SOAP envelope in your postman's request. Take a note of the POST URL, and the Content-Type that has been set to text/xml. We have also added SOAPAction key in headers whose value is ''.
Click on Send button.
We receive a response with status 200 OK. We also get the server URL and the unique session ID.
Now lets query the Account object. Enter the below SOAP envelope in your postman's request. Take a note of the POST URL that we received in our response before.
Lets retrieve server timestamp. Note that I am just changing the SOAP payload.
Lets create an account. Enter the below SOAP envelope in your postman's request.
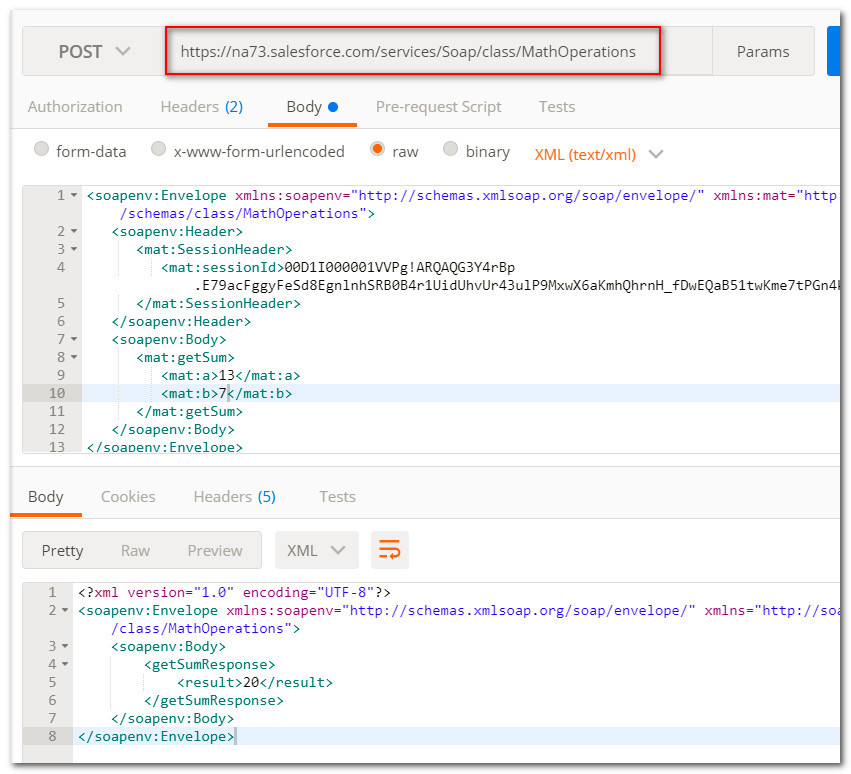
Enter the below SOAP envelope in your postman's request. Take a note of the POST URL
For SOAP web services API testing, I will be using Postman. This is available as a Chrome extension.
As a first step, you issue a login request where you provide the password and token, as a response to which, you get the session ID and the target URL. To authenticate SOAP API users, you need to acquire session ID.
Enter the below SOAP envelope in your postman's request. Take a note of the POST URL, and the Content-Type that has been set to text/xml. We have also added SOAPAction key in headers whose value is ''.
<?xml version="1.0" encoding="utf-8" ?>
<env:Envelope xmlns:xsd="http://www.w3.org/2001/XMLSchema"
    xmlns:xsi="http://www.w3.org/2001/XMLSchema-instance"
    xmlns:env="http://schemas.xmlsoap.org/soap/envelope/">
  <env:Body>
    <n1:login xmlns:n1="urn:enterprise.soap.sforce.com">
      <n1:username>USERNAME</n1:username>
      <n1:password>PASSWORD</n1:password>
    </n1:login>
  </env:Body>
</env:Envelope>
Click on Send button.
We receive a response with status 200 OK. We also get the server URL and the unique session ID.
Now lets query the Account object. Enter the below SOAP envelope in your postman's request. Take a note of the POST URL that we received in our response before.
<?xml version="1.0" encoding="utf-8"?>
<soapenv:Envelope xmlns:soapenv="http://schemas.xmlsoap.org/soap/envelope/"
   xmlns:urn="urn:enterprise.soap.sforce.com">
  <soapenv:Header>
     <urn:SessionHeader>
        <urn:sessionId>00D1I000001VVPg!ARQAQG3Y4rBp.E79acFggyFeSd8EgnlnhSRB0B4r1UidUhvUr43ulP9MxwX6aKmhQhrnH_fDwEQaB51twKme7tPGn4kFo5Xr</urn:sessionId>
     </urn:SessionHeader>
  </soapenv:Header>
  <soapenv:Body>
     <urn:query>
        <urn:queryString>SELECT Id, Name FROM Account</urn:queryString>
     </urn:query>
  </soapenv:Body>
</soapenv:Envelope>
Lets retrieve server timestamp. Note that I am just changing the SOAP payload.
Lets create an account. Enter the below SOAP envelope in your postman's request.
<?xml version="1.0" encoding="utf-8"?>
<soapenv:Envelope xmlns:soapenv="http://schemas.xmlsoap.org/soap/envelope/"
  xmlns:urn="urn:enterprise.soap.sforce.com"
  xmlns:urn1="urn:sobject.enterprise.soap.sforce.com"
  xmlns:xsi="http://www.w3.org/2001/XMLSchema-instance">
  <soapenv:Header>
     <urn:SessionHeader>
        <urn:sessionId>00D1I000001VVPg!ARQAQG3Y4rBp.E79acFggyFeSd8EgnlnhSRB0B4r1UidUhvUr43ulP9MxwX6aKmhQhrnH_fDwEQaB51twKme7tPGn4kFo5Xr</urn:sessionId>
     </urn:SessionHeader>
  </soapenv:Header>
  <soapenv:Body>
     <urn:create>
        <urn:sObjects xsi:type="urn1:Account"> <!--Zero or more repetitions:-->
           <!--You may enter ANY elements at this point-->
           <Name>Test Account</Name>
        </urn:sObjects>
     </urn:create>
  </soapenv:Body>
</soapenv:Envelope>
Exposing Apex Methods as SOAP Web Services
Apex class methods can be exposed as custom SOAP Web service calls. Use the webservice keyword to define these methods.global class MathOperations {
webservice static Integer getSum (Integer a, Integer b) {
return a + b;
}
}Enter the below SOAP envelope in your postman's request. Take a note of the POST URL


